You are going to love these. They are absolutely divine and I’m trying so hard not to eat a second one…dude, I’m totally failing *eats a second one*
These aren’t overwhelming with a super strong coffee flavor at all, so even if you aren’t a huge coffee fan I bet you’ll still enjoy these. They have only the slightest hint of coffee flavor, but it enhances the chocolate so you’re not just tasting straight up coffee — you’re tasting a mouthgasm. Pure chocolatey-mocha’y-coffee’y-decadence. I love the texture of this cupcake, its super moist and tender but has great structure so it holds up. The buttercream is pure heaven on a stick — it’s incredibly fluffy and literally melts in your mouth and isn’t gritty at all. I always make my buttercreams a good hour or two in advance just so the flavors can really meld, and this one is pure butterlust.
- Q. Where the heck can I buy “espresso powder”?
- A. At the grocery store
 It’s usually labeled “instant espresso coffee”.
Speaking of which, I didn’t have regular coffee laying around because I usually am a Tea drinker. But I did have boxes upon boxes of Gevalia dessert coffee, so I grabbed the Dark Chocolate Truffle flavor for this recipe. The flavored coffees aren’t nearly as strong as the regular stuff, so I’m sure had I used that my cupcakes would be even more amazeballs.
It literally took me about 10 minutes to make the cupcake batter and they baked for exactly 20 minutes in my oven. I’d start checking them at 17 minutes, though…you never know…ovens do indeed vary. I let mine cool for an hour before I frosted them.
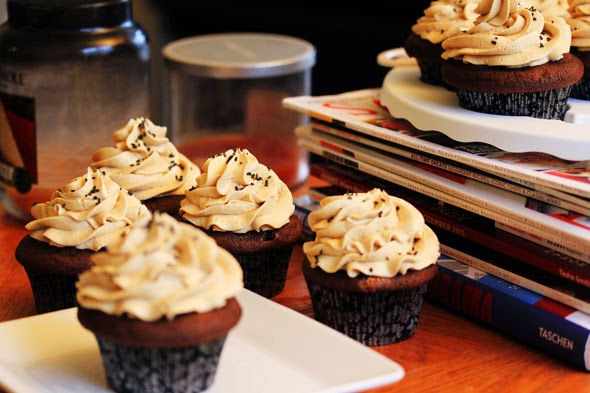


CHOCOLATE MOCHA CUPCAKES WITH ESPRESSO BUTTERCREAM

PREP TIME
COOK TIME
TOTAL TIME
adapted from Brown Eyed Baker
Serves: 12 cupcakes
INGREDIENTS
For the Mocha cupcakes:
- 1⅓ cups all-purpose flour
- ⅓ cup unsweetened cocoa powder
- 1 teaspoon baking powder
- ½ teaspoon baking soda
- ¼ teaspoon salt
- ½ cup whole milk
- ½ cup strong brewed coffee
- 1½ teaspoons espresso powder
- 1 teaspoon vanilla extract
- ½ cup (1 stick) unsalted butter, at room temperature
- ½ cup granulated sugar
- ½ cup light brown sugar
- 1 egg, at room temperature
For the Espresso Buttercream:
- 1 cup (2 sticks) unsalted butter, at room temperature
- 2½ cups powdered sugar
- 1½ teaspoons vanilla extract
- 1½ teaspoons espresso powder
- 1 tbsp half & half or heavy cream
- pinch of salt
INSTRUCTIONS
For the Mocha cupcakes:
- Mix the espresso powder into the brewed coffee until dissolved; set aside to cool to room temperature.
- Preheat the oven to 350 degrees F. Line a standard-size muffin tin with paper liners.
- Whisk together the flour, cocoa powder, baking powder, baking soda and salt.
- Beat the butter and both sugars together on medium-high speed until light and fluffy, about 2-3 minutes. Add the egg and beat until combined. In a measuring cup, combine the milk, brewed coffee mixture and vanilla. Slowly add the flour mixture, alternating with the coffee mixture, ending with the flour mixture.
- Divide the batter evenly between the 12 liners. Baking for 17-20 minutes or until a toothpick inserted in the center of a cupcake comes out clean. Cool completely before frosting cupcakes.
For the Espresso Buttercream:
- Mix the espresso powder into the vanilla until dissolved; set aside.
- Using the whisk attachment of a stand mixer, whip the butter on medium-high speed for 5 minutes, stopping once to scrape the sides of the bowl. Reduce the mixer speed to low and add the powdered sugar a little at a time, waiting until it is mostly incorporated before adding more. Once all of the powdered sugar has been added, scrape the sides of the bowl and increase the speed to medium-high and whip until fluffy, about a minute or two. Add the espresso, salt, half & half or heavy cream, and the vanilla mixture and continue to mix at medium-high until it is completely incorporated, scraping the sides as necessary.
Comments
Post a Comment